Custom Search
Showing posts with label Tricks. Show all posts

Sunday, March 11, 2012

5 Tips and Tricks for Using Yum

If you're using one of the Fedora/Red Hat derived Linux distributions, odds are you spend some time working with Yum. You probably already know the basics, like searching packages and how to install or remove them. But if that's all you know, you're missing out on a lot of features that make Yum interesting. Let's take a look at a few of the less commonly used Yum features.


If you're using one of the Fedora/Red Hat derived Linux distributions, odds are you spend some time working with Yum. You probably already know the basics, like searching packages and how to install or remove them. But if that's all you know, you're missing out on a lot of features that make Yum interesting. Let's take a look at a few of the less commonly used Yum features.

Yum comes with a lot of different distributions, but I'm going to focus on Fedora here. Mainly because that's what I'm running while I'm writing this piece. I believe most, if not all, of this should apply to CentOS, Red Hat Enterprise Linux, etc., but if not, you may need to check your man pages or system documentation.

Working with Groups

If you use the PackageKit GUI, you can view and manage packages by groups. This is pretty convenient if you want to install everything for a MySQL database or all packages you should need for RPM development.

But, what if you (like me) prefer to use the command line? Then you've got the group commands.

To search all groups, use yum group list. This will produce a full list of available groups to install or remove. (Yum lists the groups by installed groups, installed language groups, and then available groups and language groups.)

To install a group, use yum group install "group name". Note that you may need quotes because most group names are two words. If you need to remove the group, just use yum group remove "group name".

Want to learn more about a group? Just use yum group info with the group name.

Love the Yum Shell

If you're going to be doing a lot of package management, you want to get to know the Yum shell.

Just run yum shell and you'll be dumped in the Yum shell. (Which makes sense. It'd be weird if you got a DOS prompt or something...) Now you can run whatever Yum commands you need to until you're ready to exit the Yum shell.

For instance, want to search packages? Just type search packagename.

Here's the primary difference, when running things like install or remove, Yum will not complete the transaction immediately. You need to issue the run command to tell Yum to do it. This gives you the advantage of being able to tell Yum to do several things, and then actually run the transactions.

The Yum shell does have a few commands that aren't available at the command line. For instance, you can use config to set configuration options, and ts will show you the transaction set or reset it. The repo command will let you list, enable, and disable repos.

If you're not sure what commands the shell has, run help and check the yum-shell man page.

You can exit the Yum shell with exit or quit.

Use Yum Plugins

Yum isn't a one-size-fits-all tool. It's actually extensible, and has a plugin system that allows developers to create added functionality that doesn't have to be added to the core of Yum.

This helps contribute to Yum's performance by not including all functionality by default. If the user doesn't need the plugin's functionalty, why bog Yum down with it?

Different distributions have different plugins available, but the fastest way to see which Yum plugins available is to run yum search yum-plugin or yum search yum | grep plugin. (Note that a few plugins might not turn up with the first search, like yum-presto or yum-langpacks.)

Most likely, plugins are enabled by default. To be sure, though, open /etc/yum.conf and check that you have this line:

plugins=1

If it says plugins=0 you'll need to change it.

View Changelogs

One of the plugins I'm fond of is the changelog plugin. If you have this installed you can view the changelogs for packages, even if they're not installed.

To view a changelog just run yum changelog packagename or just changelog packagename if you're in the Yum shell.

Yum Downgrade

Sometimes upgrades aren't all they're cracked up to be. If an upgrade has you down (sorry), you might want to try downgrading to the previous version.

To do this, just use yum downgrade name where "name" is either the package, group or other target that Yum will work with. (See the man page for the full list.

The caveat here is that it doesn't work with some packages, like kernel packages. But if you're in a pinch, give it a shot.

More to Come...

That's all, for now. But there's plenty more fun where that came from. Next time around, we'll take a tour of some of the most interesting Yum plugins and how you can use them to make managing your system even easier.

]]>
This post was made using the Auto Blogging Software from WebMagnates.org This line will not appear when posts are made after activating the software to full version.

Friday, March 2, 2012

Unknown Bash Tips and Tricks For Linux

Familiarity breeds ennui, and even though Bash is the default Linux command shell used daily by hordes of contented users, it contains a wealth of interesting and useful features that don't get much attention. Today we shall learn about Bash builtins and killing potential.

Familiarity breeds ennui, and even though Bash is the default Linux command shell used daily by hordes of contented users, it contains a wealth of interesting and useful features that don't get much attention. Today we shall learn about Bash builtins and killing potential.

Bash Builtins

Bash has a bunch of built-in commands, and some of them are stripped-down versions of their external GNU coreutils cousins. So why use them? You probably already do, because of the order of command execution in Bash:

Bash aliases Bash keywords Bash functions Bash builtins Scripts and executable programs that are in your PATH

So when you run echo, kill, printf, pwd, or test most likely you're using the Bash builtins rather than the GNU coreutils commands. How do you know? By using one of the Bash builtins to tell you, the command command:


$ command -V echoecho is a shell builtin$ command -V pingping is /bin/ping


The Bash builtins do not have man pages, but they do have a backwards help builtin command that displays syntax and options:


$ help echoecho: echo [-neE] [arg ...] Write arguments to the standard output. Display the ARGs on the standard output followed by a newline. Options: -n do not append a newline -e enable interpretation of the following backslash escapes[...]


I call it backwards because most Linux commands use a syntax of commandname --help, where help is a command option instead of a command.

The type command looks a lot like the command builtin, but it does more:


$ type -a catcat is /bin/cat$ type -t catfile$ type llll is aliased to `ls -alF'$ type -a echoecho is a shell builtinecho is /bin/echo$ type -t grepalias


The type utility identifies builtin commands, functions, aliases, keywords (also called reserved words), and also binary executables and scripts, which it calls file. At this point, if you are like me, you are grumbling "How about showing me a LIST of the darned things." I hear and obey, for you can find these delightfully documented in the The GNU Bash Reference Manual indexes. Don't be afraid, because unlike most software documention this isn't a scary mythical creature like Sasquatch, but a real live complete command reference.

The point of this little exercise is so you know what you're really using when you type a command into the Bash shell, and so you know how it looks to Bash. There is one more overlapping Bash builtin, and that is the time keyword:


$ type -t timekeyword


So why would you want to use Bash builtins instead of their GNU cousins? Builtins may execute a little faster than the external commands, because external commands have to fork an extra process. I doubt this is much of an issue on modern computers because we have horsepower to burn, unlike the olden days when all we had were tiny little nanohertzes, but when you're tweaking performance it's one thing to look at. When you want to use the GNU command instead of the Bash builtin use its whole path, which you can find with command, type, or the good old not-Bash command which:


$ which echo/bin/echo$ which which/usr/bin/which

 Bash Functions

Run declare -F to see a list of Bash's builtin function names. declare -f prints out the complete functions, and declare -f [function-name] prints the named function. type won't find list functions, but once you know a function name it will also print it:

$ type quotequote is a functionquote () { echo \'${1//\'/\'\\\'\'}\'}

This even works for your own functions that you create, like this simple example testfunc that does one thing: changes to the /etc directory:

$ function testfunc> {> cd /etc> }

Now you can use declare and type to list and view your new function just like the builtins.

Bash's Violent Side

Don't be fooled by Bash's calm, obedient exterior, because it is capable of killing. There have been a lot of changes to how Linux manages processes, in some cases making them more difficult to stop, so knowing how to kill runaway processes is still an important bit of knowledge. Fortunately, despite all this newfangled "progress" the reliable old killers still work.

I've had some troubles with bleeding-edge releases of KMail; it hangs and doesn't want to close by normal means. It spawns a single process, which we can see with the ps command:

ps axf|grep kmail 2489 ? Sl 1:44 /usr/bin/kmail -caption KMail

You can start out gently and try this:

$ kill 2489

This sends the default SIGTERM (signal terminate) signal, which is similar to the SIGINT (signal interrupt) sent from the keyboard with Ctrl+c. So what if this doesn't work? Then you amp up your stopping power and use SIGKILL, like this:

$ kill -9 2489

This is the nuclear option and it will work. As the relevant section of the GNU C manual says: "The SIGKILL signal is used to cause immediate program termination. It cannot be handled or ignored, and is therefore always fatal. It is also not possible to block this signal." This is different from SIGTERM and SIGINT and other signals that politely ask processes to terminate. They can be trapped and handled in different ways, and even blocked, so the response you get to a SIGTERM depends on how the program you're trying to kill has been programmed to handle signals. In an ideal world a program responds to SIGTERM by tidying up before exiting, like finishing disk writes and deleting temporary files. SIGKILL knocks it out and doesn't give it a chance to do any cleanup. (See man 7 signal for a complete description of all signals.)


So what's special about Bash kill over GNU /bin/kill? My favorite is how it looks when you invoke the online help summary:

$ help kill

Another advantage is it can use job control numbers in addition to PIDs. In this modern era of tabbed terminal emulators job control isn't the big deal it used to be, but the option is there if you want it. The biggest advantage is you can kill processes even if they have gone berserk and maxed out your system's process number limit, which would prevent you from launching /bin/kill. Yes, there is a limit, and you can see what it is by querying /proc:

$ cat /proc/sys/kernel/threads-max61985

With Bash kill there are several ways to specify which signal you want to use. These are all the same:

$ kill 2489$ kill -s TERM 2489$ kill -s SIGTERM 2489$ kill -n 1 2489

kill -l lists all supported signals.

If you spend a little quality time with man bash and the GNU Bash Manual I daresay you will learn more valuable tasks that Bash can do for you.

]]>
This post was made using the Auto Blogging Software from WebMagnates.org This line will not appear when posts are made after activating the software to full version.
Thursday, February 23, 2012

Expert Tips and Tricks With Kate and Konsole

The Kate graphical text editor and Konsole graphical terminal emulator are chock-full of advanced features and time-saving shortcuts. They work nicely together to make the lives of system administrators, writers, users, and programmers easier. Here is a look at some of the ways to make these power tools work for you.

The Kate graphical text editor and Konsole graphical terminal emulator are chock-full of advanced features and time-saving shortcuts. They work nicely together to make the lives of system administrators, writers, users, and programmers easier. Here is a look at some of the ways to make these power tools work for you.

Simplicity

Let's have a little chat about simplicity first, because I think this is quite misunderstood. A personal computer is a mighty all-purpose beast that serves whatever role you can imagine, and Linux is the most flexible computing platform of all, for everything from tiny embedded devices to supercomputers. The average low-budget PC outperforms the supercomputers of yesteryear.

This vast flexibility can be rather daunting, and one approach to managing it is to strip away functionality and hide what it's doing from the fragile eyes of the user. That is supposed to make it easier for us. I think it makes it harder because then we're stuck with an inflexible, opaque system that we cannot tailor to our own needs, and we have to invest time and ingenuity in working around the shortcomings of the "simplified" system.

Real simplicity is when we can tailor software applications to suit our needs, and to support an efficient, fast workflow. Workflow is everything, because every redundant keystroke and mouse click and inefficiency multiplies with every use. Life is too short to waste on clunky dumb tools that waste our time.

Kate

And so we segue nicely to Kate, the über KDE graphical text editor. I do most of my writing in Kate. I used to rely on Vim, which I still like and use on the console, but Kate has won my heart for most writing chores.

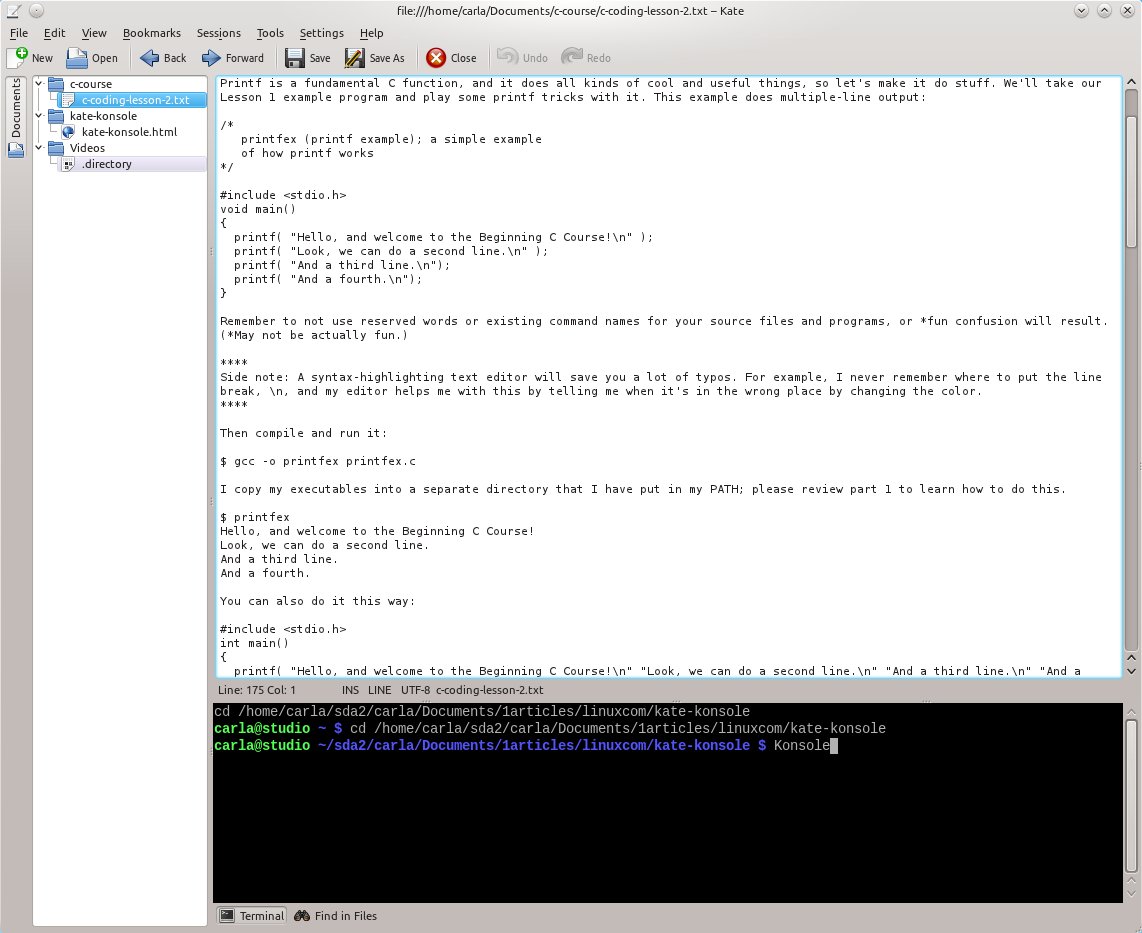
Kate has the advantages of a graphical interface so you have both keyboard and mouse, a graphical file picker, graphical configuration menus, and an integrated Konsole window. Figure 1 shows what all this looks like.

My first task with a new Kate is to customize the keyboard shortcuts with Settings -> Configure Shortcuts. You can control everything in Kate from the keyboard. Vi/Vim fans can set it to Vi Input Mode, which doesn't include all of Vi's mighty power tools like autotext, abbreviations, or mappings. But it does include a lot of mode and navigation commands.

Kate has keyboard controls for zoom, Forward and Back in the document tree, New File, New Window, Delete Line, Delete Word Left/Right, Select Page Up/Down, Select to End of Document, Select to End of Line, and many more. I don't try to remember keyboard shortcuts for every last little thing, but rather for the tasks that I do the most. Kate even support multiple keyboard shortcut schemes, which you can set up by clicking the Details button at the bottom of the Configure Shortcuts window.

Kate supports sessions, which you set up in the Sessions menu. This is a super time-saving feature for multiple-document projects because you can save all the documents and window configuration, including split views, in a single session. kate -s sessionname opens Kate to your chosen session, or creates a new one.

Speaking of multiple documents, you can use View -> Split View to see multiple documents at once, as many as you want, stacked either vertically or horizontally, and you can drag the splitter between the documents to resize them. When you close a split view the document remains open.

Kate comes with syntax highlighting and modes for dozens of scripting and programming languages (Tools > Mode/Highlighting), including some unusual ones like Lilypond, Wesnoth Markup Language for the Battle of Wesnoth game, MatLab, and POV-Ray.

When you're navigating a long complex document Kate's bookmarks will save your bacon every time, and the feature I love most is Ctrl+ Up/Down arrow, which scrolls up and down without moving the cursor. Kate does code folding, which is temporarily hiding sections of code, and you can automatically comment out a section of code by selecting it and then pressing Ctrl+d. Un-comment it with Ctrl+Shift+d. Another feature I use a lot is File -> Open With whatever external application I want. When I'm writing Web articles I use it to preview my work in a Web browser.

Tools -> Synchronize Terminal With Current Document makes the built-in terminal change to current working directory of the open document.

Kate has a bunch of nice plugins that you can activate via Settings -> Configure Kate -> Applications -> Plugins, and extensions via Settings -> Configure Kate -> Editor Component -> Extensions.

There is one conspicuously missing feature, and that is word count. I open the terminal, sync to the current document, and run wc -w filename. It's clunky but it works.

There are a whole lot more things Kate can do which you can find by poking around in the menus, and the Kate Handbook is helpful.

Konsole

Konsole is the KDE4 graphical terminal emulator, and it also supports keyboard shortcuts for all operations, profiles, bookmarks, and split views. Let's start with View -> Split View, which is a source of confusion because the split is a clone, not an independent window.

The purpose of this is to give two views of the same document or whatever output you are monitoring. For example, suppose you are studying a long configuration file. The split view shows the same document in both panes, but you can scroll independently to bring up different sections of the document side-by-side. Just like Kate you can open as many splits as you want.

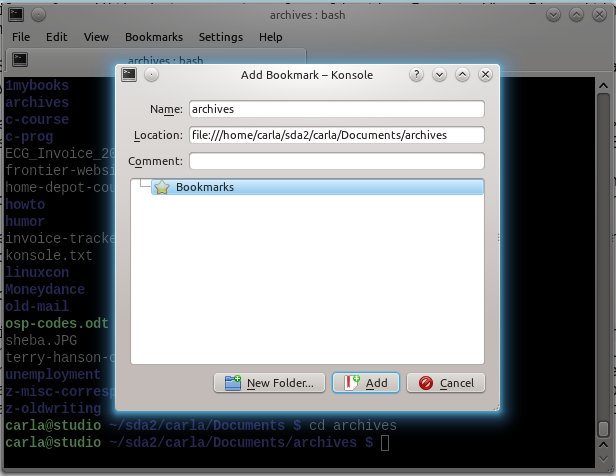
Konsole's Bookmarks menu is a nice time-saver, because you can bookmark any directory just like bookmarking Web sites in a Web browser, and you can bookmark all open tabs in a single folder (figure 2). It also supports ssh and telnet sessions, for example ssh://carla@server, or telnet://carla@otherserver.

Figure 2: Creating a new Konsole bookmark.

You can use Edit -> Copy Input To all open tabs in the current window, or selected tabs in the current window. This is useful, to give one example, for running the same commands on multiple hosts at the same time over SSH. I would like it even better if it supported multiple windows instead of tabs so I could see everything at once, but it doesn't.

File -> Save Output As operates like the tee command; it sends all screen output to a text file while it displays the same output on the screen. This is a great way to create an audit trail so you can go back and see what the heck you did.

Want to select columns of your screen output? Press Ctrl+Alt while selecting with the mouse.

Double-clicking selects a single word, and on the Advanced tab of the profile configuration dialog you can configure which characters should be considered part of word, such as the hyphen, tilde, hash mark, or any mark you want included in a double-click word selection. Triple-click selects a line.

While you're in the profile configurator, check out the General tab – this has some useful basic tweaks, plus you can set the default directory to open to.

You can always do the quick Unix-style copy and paste of select with mouse/middle-click paste, and can also copy with Ctrl+Shift+c, and paste with Ctrl+Shift+Insert.

There many more useful features in both Kate and Konsole, such as scripting support and command-line operations. Please visit the Kate Editor Homepage and Konsole to learn more about these excellent applications.

]]>

Expert Tips and Tricks With Kate and Konsole

The Kate graphical text editor and Konsole graphical terminal emulator are chock-full of advanced features and time-saving shortcuts. They work nicely together to make the lives of system administrators, writers, users, and programmers easier. Here is a look at some of the ways to make these power tools work for you.

Simplicity

Let's have a little chat about simplicity first, because I think this is quite misunderstood. A personal computer is a mighty all-purpose beast that serves whatever role you can imagine, and Linux is the most flexible computing platform of all, for everything from tiny embedded devices to supercomputers. The average low-budget PC outperforms the supercomputers of yesteryear.

This vast flexibility can be rather daunting, and one approach to managing it is to strip away functionality and hide what it's doing from the fragile eyes of the user. That is supposed to make it easier for us. I think it makes it harder because then we're stuck with an inflexible, opaque system that we cannot tailor to our own needs, and we have to invest time and ingenuity in working around the shortcomings of the "simplified" system.

Real simplicity is when we can tailor software applications to suit our needs, and to support an efficient, fast workflow. Workflow is everything, because every redundant keystroke and mouse click and inefficiency multiplies with every use. Life is too short to waste on clunky dumb tools that waste our time.

Kate

And so we segue nicely to Kate, the über KDE graphical text editor. I do most of my writing in Kate. I used to rely on Vim, which I still like and use on the console, but Kate has won my heart for most writing chores.

Kate has the advantages of a graphical interface so you have both keyboard and mouse, a graphical file picker, graphical configuration menus, and an integrated Konsole window. Figure 1 shows what all this looks like.Figure 1: Kate with three files and the integrated Konsole window open.

My first task with a new Kate is to customize the keyboard shortcuts with Settings -> Configure Shortcuts. You can control everything in Kate from the keyboard. Vi/Vim fans can set it to Vi Input Mode, which doesn't include all of Vi's mighty power tools like autotext, abbreviations, or mappings. But it does include a lot of mode and navigation commands.

Kate has keyboard controls for zoom, Forward and Back in the document tree, New File, New Window, Delete Line, Delete Word Left/Right, Select Page Up/Down, Select to End of Document, Select to End of Line, and many more. I don't try to remember keyboard shortcuts for every last little thing, but rather for the tasks that I do the most. Kate even support multiple keyboard shortcut schemes, which you can set up by clicking the Details button at the bottom of the Configure Shortcuts window.

Kate supports sessions, which you set up in the Sessions menu. This is a super time-saving feature for multiple-document projects because you can save all the documents and window configuration, including split views, in a single session. kate -s sessionname opens Kate to your chosen session, or creates a new one.

Speaking of multiple documents, you can use View -> Split View to see multiple documents at once, as many as you want, stacked either vertically or horizontally, and you can drag the splitter between the documents to resize them. When you close a split view the document remains open.

Kate comes with syntax highlighting and modes for dozens of scripting and programming languages (Tools > Mode/Highlighting), including some unusual ones like Lilypond, Wesnoth Markup Language for the Battle of Wesnoth game, MatLab, and POV-Ray.

When you're navigating a long complex document Kate's bookmarks will save your bacon every time, and the feature I love most is Ctrl+ Up/Down arrow, which scrolls up and down without moving the cursor. Kate does code folding, which is temporarily hiding sections of code, and you can automatically comment out a section of code by selecting it and then pressing Ctrl+d. Un-comment it with Ctrl+Shift+d. Another feature I use a lot is File -> Open With whatever external application I want. When I'm writing Web articles I use it to preview my work in a Web browser.

Tools -> Synchronize Terminal With Current Document makes the built-in terminal change to current working directory of the open document.

Kate has a bunch of nice plugins that you can activate via Settings -> Configure Kate -> Applications -> Plugins, and extensions via Settings -> Configure Kate -> Editor Component -> Extensions.

There is one conspicuously missing feature, and that is word count. I open the terminal, sync to the current document, and run wc -w filename. It's clunky but it works.

There are a whole lot more things Kate can do which you can find by poking around in the menus, and the Kate Handbook is helpful.

Konsole

Konsole is the KDE4 graphical terminal emulator, and it also supports keyboard shortcuts for all operations, profiles, bookmarks, and split views. Let's start with View -> Split View, which is a source of confusion because the split is a clone, not an independent window.

The purpose of this is to give two views of the same document or whatever output you are monitoring. For example, suppose you are studying a long configuration file. The split view shows the same document in both panes, but you can scroll independently to bring up different sections of the document side-by-side. Just like Kate you can open as many splits as you want.

Konsole's Bookmarks menu is a nice time-saver, because you can bookmark any directory just like bookmarking Web sites in a Web browser, and you can bookmark all open tabs in a single folder (figure 2). It also supports ssh and telnet sessions, for example ssh://carla@server, or telnet://carla@otherserver.

Figure 2: Creating a new Konsole bookmark.

You can use Edit -> Copy Input To all open tabs in the current window, or selected tabs in the current window. This is useful, to give one example, for running the same commands on multiple hosts at the same time over SSH. I would like it even better if it supported multiple windows instead of tabs so I could see everything at once, but it doesn't.

File -> Save Output As operates like the tee command; it sends all screen output to a text file while it displays the same output on the screen. This is a great way to create an audit trail so you can go back and see what the heck you did.

Want to select columns of your screen output? Press Ctrl+Alt while selecting with the mouse.

Double-clicking selects a single word, and on the Advanced tab of the profile configuration dialog you can configure which characters should be considered part of word, such as the hyphen, tilde, hash mark, or any mark you want included in a double-click word selection. Triple-click selects a line.

While you're in the profile configurator, check out the General tab – this has some useful basic tweaks, plus you can set the default directory to open to.

You can always do the quick Unix-style copy and paste of select with mouse/middle-click paste, and can also copy with Ctrl+Shift+c, and paste with Ctrl+Shift+Insert.

There many more useful features in both Kate and Konsole, such as scripting support and command-line operations. Please visit the Kate Editor Homepage and Konsole to learn more about these excellent applications.


busy