Custom Search

Saturday, January 28, 2012

Organizing Open Source Efforts at NASA

"When I think of open source, Linux is the core," says William Eshagh, a technologist working on Open Government and the Nebula Cloud Computing Platform out of the NASA Ames Research Center. Eshagh recently announced the launch of code.nasa.gov, a new NASA website intended to help the organization unify and expand its open source activities. Recently I spoke with Eshagh and his colleague, Sean Herron, a technology strategist at NASA, about the new site and the roles Linux and open source play at the organization.

"When I think of open source, Linux is the core," says William Eshagh, a technologist working on Open Government and the Nebula Cloud Computing Platform out of the NASA Ames Research Center. Eshagh recently announced the launch of code.nasa.gov, a new NASA website intended to help the organization unify and expand its open source activities. Recently I spoke with Eshagh and his colleague, Sean Herron, a technology strategist at NASA, about the new site and the roles Linux and open source play at the organization.

Eshagh says that the idea behind the NASA code site is to highlight the Linux and open source projects at NASA. "We believe that the future is open," he says. Although NASA uses a broad array of technology, Linux is the default system and has found its way into both space and operational systems. In fact, the websites are built on Linux, the launch countdown clock runs on Fedora servers, and Nebula, the open-source cloud computing project, is Ubuntu based. Further, NASA worked with Rackspace Hosting to launch the OpenStack project, the open source cloud computing platform for public and private clouds.

Why is NASA contributing to open source? Eshagh says that NASA's open systems help inspire the public and provide an opportunity for citizens to work with the organization and help move its missions forward. But the code site isn't only about sharing with the public and making NASA more open. The site itself is intended to help NASA figure out how the organization is participating in open source projects.

Three Phase Approach

In the initial phase, the code site organizers are focusing on providing a central location to organize the open source activities at NASA and lower the barriers to building open technology with the help of the public. Herron says that the biggest barrier is that people simply don't know what's going on in NASA because there is no central list of open source projects or contributions. Within NASA, employees don't even have a way to figure out what their colleagues are working on, or who to talk to within the organization about details such as open source licenses.

At NASA, the open source process starts with the Software Release Authority, which approves the release of software. Eshagh says that even finding the names of the people in the Software Release Authority was an exercise, so moving the list of names out front and shining a light on it makes it easier to find the person responsible. The new guide on the code site explains the software release guidelines and provides a list of contacts and details about releasing the software, such as formal software engineering requirements.

Phase two of the code project is community focused and has already started. Eshagh says there's a lot of interest in open source at NASA, including internal interest, but the open.NASA team is still trying to figure out the best way to connect people with projects within the agency.

Eshagh says that the third phase, which focuses on version control, issue tracking, documentation, planning, and management, is more complicated. He points to the Goddard General Mission Analysis Tool (GMAT), an open source, platform independent trajectory optimization and design system, as an example. There is no coherent or coordinated approach to develop software and accept contributions from the public and industry. "What services do they need to be successful? What guidance do they need from NASA?," Eshagh wonders. "We're trying to find best-of-breed software solutions online; GitHub comes to mind," he says.

Phase three also will include the roll out of documentation systems and a wiki, which Eshagh and his team want to offer as a service, but in a focused, organized way to help projects move forward. He says that NASA doesn't promote any project or product – they just want the best tool for the job. "We're taking an iterative approach and making information available as we get it and publish it," Herron says. They've already received a bunch of feedback about licenses, for example.

Measuring Success

How will the open.NASA team measure the success of the code site and their other efforts? "We're trying to build a community," Eshagh explains. "We've kind of tapped into an unsatisfied need for public and private individuals to come together."

He says they'll measure success by how many projects that they didn't previously know about come forward and highlight what they are doing. "People are actually reaching out and I think that's a measure of success," he says. Also, the quantity and quality of the projects and toolchains, as well as how many people use them, will be considerations.

Tackling Version Control

In December, Eshagh announced NASA's presence on GitHub, and their first public repository houses NASA's World Wind Java project, an open source 3D interactive world viewer. Additional projects are being added, including OpenMDAO, an open-source Multidisciplinary Design Analysis and Optimization (MDAO) framework; NASA Ames StereoPipeline, a suite of automated geodesy and stereogrammetry tools; and NASA Vision Workbench, a general-purpose image processing and computer vision library.

In March 2011, NASA hosted its first Open Source Summit at Ames Research Center in Mountain View California. GitHub CEO Chris Wanstrath and Pascal Finette, Director of Mozilla Labs, were among the speakers. Eshagh says that at the event, he learned that when Erlang was first released on GitHub, contributions increased by 500 percent. "We are hoping to tap into that energy," he adds.

"A lot of our projects were launched under SVN and continue to be operated under there," Eshagh says. Now open.NASA is looking at git-svn to bridge these source control systems.

"A lot of projects don't have change history or version control, so GitHub will help with source control and make it visible and available," Herron adds. Since they've posted the GitHub projects, Eshagh and his team have already seen some forks and contributions back, but he says the trick is to figure out how to get the project owners to engage and monitor the projects or to move to one system.

Which NASA projects would Eshagh like to see added to GitHub? "We have so many projects, we don't have favorites," he says. "If this is a viable solution, increases participation, and makes it easier for developers to develop, then we'd like to see them there." He adds that his team would like to see all of NASA's open source projects have version control, use best practices, and be handled in a way that the public can see them.

2011 Achievements

At the end of 2011, Nick Skytland, Program Manager of Open Government at the Johnson Space Center, posted the 2011 Annual Report by the NASA Open Government Initiative. His infographic says that there were 140,000,000 views of the NASA homepage; 17 Tweetups held with more than 1,600 participants; 2,371,250 combined followers on Twitter, Facebook, and Google+; and 50,000 followers on Google+ within the first 25 days.

"The scope and reach of our social media is not insignificant," Eshagh says. Herron points out that the nasa.gov site is the most visited US government site. He says that the community is very engaged. "People love to see our code," he adds. "People are excited about it." In fact, the open source team hopes to use their code to keep people excited about the space program.

NASA is now in an interesting phase, Eshagh explains. He says that after the space shuttle program ended last year, NASA Deputy Administrator Lori Garver was speaking to a group of students when one of them asked her whether she's now out of a job. (She's not.) The new code site helps illustrate how many projects are still active and growing at NASA. "We still have a lot of work to do and a lot of people are pulling for us," Eshagh says.

]]>
Weekend Project: Learning Ins and Outs of Arduino

Arduino is an open embedded hardware and software platform designed for rapid creativity. It's both a great introduction to embedded programming and a fast track to building all kinds of cool devices like animatronics, robots, fabulous blinky things, animated clothing, games, your own little fabs... you can build what you imagine. Follow along as we learn both embedded programming and basic electronics.

Arduino is an open embedded hardware and software platform designed for rapid creativity. It's both a great introduction to embedded programming and a fast track to building all kinds of cool devices like animatronics, robots, fabulous blinky things, animated clothing, games, your own little fabs... you can build what you imagine. Follow along as we learn both embedded programming and basic electronics.

What Does Arduino Do?

Arduino was invented by Massimo Banzi, a self-taught electronics guru who has been fascinated by electronics since childhood. Mr. Banzi had what I think of as a dream childhood: endless hours spent dissecting, studying, re-assembling things in creative ways, and testing to destruction. Mr. Banzi designed Arduino to be friendly and flexible to creative people who want to build things, rather than a rigid, overly-technical platform requiring engineering expertise.

The microprocessor revolution has removed a lot of barriers for newcomers, and considerably speeded up the pace of iteration. In the olden days building electronic devices means connecting wires and components, and even small changes were time-consuming hardware changes. Now a lot of electronics functions have moved to software, and changes are done in code.

Arduino is a genuinely interactive platform (not fake interactive like clicking dumb stuff on Web pages) that accepts different types of inputs, and supports all kinds of outputs: motion detector, touchpad, keyboard, audio signals, light, motors... if you can figure out how to connect it you can make it go. It's the ultimate low-cost "what-if" platform: What if I connect these things? What if I boost the power this high? What if I give it these instructions? Mr. Banzi calls it "the art of chance." Figure 1 shows an Arduino Uno; the Arduino boards contain a microprocessor and analog and digital inputs and outputs. There are several different Arduino boards.

You'll find a lot of great documentation online at Arduino and Adafruit Industries, and Mr. Banzi's book Getting Started With Arduino is a must-have.

Packrats Are Good

The world is over-full of useful garbage: circuit boards, speakers, motors, wiring, enclosures, video screens, you name it, our throwaway society is a do-it-yourselfer's paradise. With some basic skills and knowledge you can recycle and reuse all kinds of electronics components. Tons of devices get chucked into landfills because a five-cent part like a resistor or capacitor failed. As far as I'm concerned this is found money, and a great big wonderful playground. At the least having a box full of old stuff gives you a bunch of nothing-to-lose components for practice and experimentation.

The Arduino IDE

The Arduino integrated development environment (IDE) is a beautiful creation. The Arduino programming language is based on the Processing language, which was designed for creative projects. It looks a lot like C and C++. The IDE compiles and uploads your code to your Arduino board; it is fast and you can make and test a lot of changes in a short time. An Arduino program is called a sketch. See Installing Arduino on Linux for installation instructions.Figure 2: A sketch loaded into the Arduino IDE.

Hardware You Need

You will need to know how to solder. It's really not hard to learn how to do it the right way, and the Web is full of good video howtos. It just takes a little practice and decent tools. Get yourself a good variable-heat soldering iron and 60/40 rosin core lead solder, or 63/37. Don't use silver solder unless you know what you're doing, and lead-free solder is junk and won't work right. I use a Weller WLC100 40-Watt soldering station, and I love it. You're dealing with small, delicate components, not brazing plumbing joints, so having the right heat and a little finesse make all the difference.

Another good tool is a lighted magnifier. Don't be all proud and think your eyesight is too awesome for a little help; it's better to see what you're doing.

Adafruit industries sells all kinds of Arduino gear, and has a lot of great tutorials. I recommend starting with these hardware bundles because they come with enough parts for several projects:

Adafruit ARDX – v1.3 Experimentation Kit for Arduino This has an Arduino board, solderless breadboard, wires, resistors, blinky LEDs, USB cable, a little motor, experimenter's guide, and a bunch more goodies. $85.00.9-volt power supply. Seven bucks. You could use batteries, but batteries lose strength as they age, so you don't get a steady voltage.Tool kit that includes an adjustable-temperature soldering iron, digital multimeter, cutters and strippers, solder, vise, and a power supply. $100.

Other good accessories are an anti-static mat and a wrist grounding strap. These little electronics are pretty robust and don't seem bothered by static electricity, but it's cheap insurance in a high-static environment. Check out the Shields page for more neat stuff like the Wave audio shield for adding sound effects to an Arduino project, a touchscreen, a chip programmer, and LED matrix boards.

Essential Electric Terminology

Let's talk about volts (V), current (I), and resistance (r) because there is much confusion about these. Volts are measured in voltage, current is measured in amps, and resistance is measured in ohms. Electricity is often compared to water because they behave similarly: voltage is like water pressure, current is like flow rate, and resistance is akin to pipe diameter. If you increase the voltage you also increase current. A bigger pipe allows more current. If you decrease the pipe size then you increase resistance.

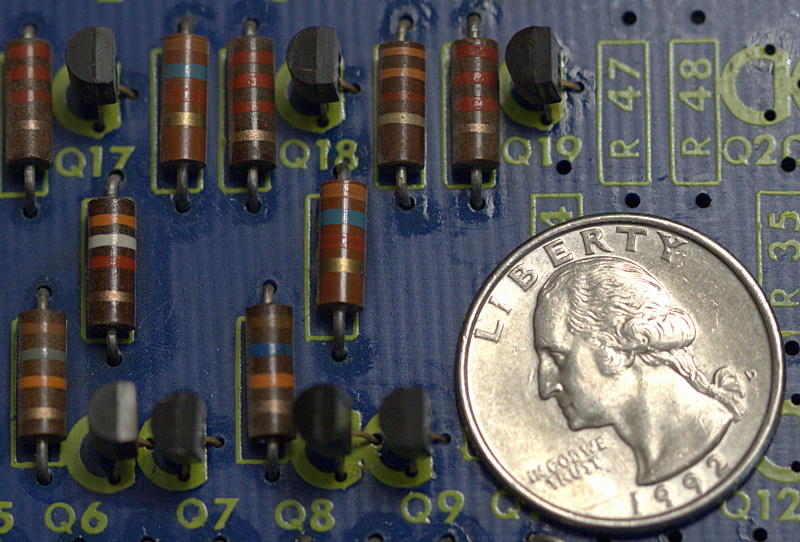
Figure 3: Circuit boards are cram-full of resistors. You will be using lots of resistors.Talk is cheap, so take a look at Figure 3. This is an old circuit board from a washing machine. See the stripey things? Those are resistors. All circuit boards have gobs of resistors, because these control how much current flows over each circuit. The power supply always pushes out more power than the individual circuits can handle, because it has to supply multiple circuits. So there are resistors on each circuit to throttle down the current to where it can safely handle it.
Again, there is a good water analogy — out here in my little piece of the world we use irrigation ditches. The output from the ditch is too much for a single row of plants, because its purpose is to supply multiple rows of plants with water. So we have systems of dams and diverters to restrict and guide the flow.

In your electronic adventures you're going to be calculating resistor sizes for your circuits, using the formula R (resistance) = V (voltage) / I (current). This is known as Ohm's Law, named for physicist Georg Ohm who figured out all kinds of neat things and described them in math for us to use. There are nice online calculators, so don't worry about getting it right all by yourself.

That's all for now. In the next tutorial, we'll learn about loading and editing sketches, and making your Arduino board do stuff.

]]>

Teach Yourself with Anki: Open Source Flashcards on Linux

Prepping for a Linux certification exam? Helping the kids with schoolwork? No matter what the subject is, Anki can help you commit it to memory. The flexible open source study system is based around the flashcard concept, but with support for audio, video, and more, and the program can adapt to your learning style.

Prepping for a Linux certification exam? Helping the kids with schoolwork? No matter what the subject is, Anki can help you commit it to memory. The flexible open source study system is based around the flashcard concept, but with support for audio, video, and more, and the program can adapt to your learning style.

Using Anki, you can make your own custom decks of "flashcards" for any subject: arithmetic, foreign languages, the state bar exam, obscure Perl syntax — you name it. The card format is flexible, supporting multimedia, text, and even embedded LaTeX for complex equations. The study tool allows you to fully configure your sessions, including optional time limits, slowly or quickly adding new cards to the set you review, and altering the order in which material is presented.

More importantly, Anki adapts your study sessions as you learn. While you work, you click on a button to rate how hard or easy you think each card is; easier cards get repeated less frequently, and harder cards get emphasized until you get the hang of them. This study concept is called spaced repetition, and it has been shown to radically improve memory in academic studies. But while it is hard to implement manually with physical flashcards, a software application makes short work of the challenge.

Getting Started

Anki's most recent release is 1.2.9, although this is a point-update targeting users who experienced database trouble with 1.2.8 -- if your distribution's package manager has any release in the 1.2.x series, you will have the current feature set. The main application is written in Python, so you can download the source files, extract them from the tarball, and start up the GUI with ./anki &. However, Anki does have a long list of dependencies in order to support its sizable selection of media formats, so if you do not check the dependencies first, you may experience hiccups.

The main GUI runs on Linux as well as on proprietary OSes, and it allows you to both create decks of flashcards and study with them. There are also several front-ends written for popular mobile device platforms, including Android and Maemo, so you can take your decks on the road and peruse your studies form anywhere.

If you want to get a feel for how Anki works before you spend time creating your own cards, you can choose "Download" from the File menu and fetch any of several hundred user-contributed decks on just about every subject imaginable. Some are homemade, but others are created by teachers and college professors. The download tool's interface is searchable, and lets you sift through the results by popularity, age, and number of cards. The only risk you run in grabbing a deck created by other users is that it may be designed to function with a specific textbook, and not make as much sense without it. Usually, however, the description field in the download tool explains the deck's origin, including this type of information.

The spaced-repetition system is intended to help you learn by repeating small study sessions over a longer period of time — days or even weeks. You can adjust the time intervals and how they apply to study session frequency, but understand that Anki's options refer to calendar time, which is unrelated to how much you actually run the program. In other words, you decide how many hours or days apart your brain gets asked the same question, not how many cards or mouse-clicks go by.

There is, however, a "cram" function in the Tools menu, which lets you run through an entire deck without regard to the spaced-repetition schedule. Last but certainly not least, Anki keeps track of your performance, timing, and difficulty ratings for each card and deck, and you can examine the statistics (including time-series graphs) from the Tools menu.

Stacking the Deck

Unless you happen to stumble onto exactly the deck you need courtesy of other Anki users, you will eventually need to create your own decks of study cards. Anki includes a built-in, visual card editor. You can edit the decks you download from the Internet or create your own from scratch just as easily — simply click on the "Add Items" button in the toolbar to create a new card, or choose "Browse Items" to open up a window listing all of the existing cards.

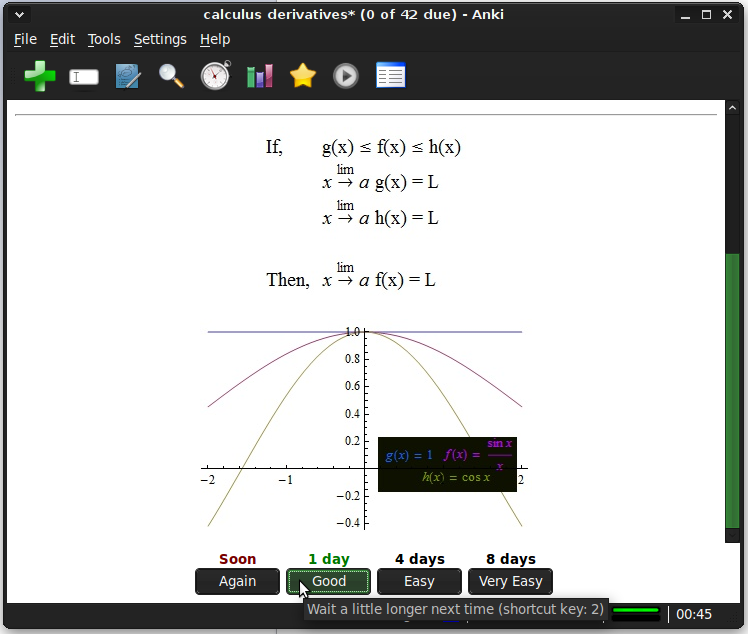
In its simplest form, the card editor has "front" and "back" layout sections, corresponding to the prompt and the answer for each card. You can freely input formatted text using the editing toolbar; you have control over text color, font mark-up (bold, italics, and underlines), and buttons to attach images, audio, video, or pre-formatted content like LaTeX or HTML. The editing interface is not as sophisticated as a slide-presentation program like LibreOffice Impress, but the idea is the same.Anki Math Card

Of course, you can make your decks more complex by taking advantage of Anki's user-defined template system. With a template, you define fields and enclose their names in double curly braces — such as {{English_word}} and {{Navajo_word}}, or {{Element}} and {{Atomic_number}}. That way, you could create one template with the element name on the "front" of each card, so that Anki asks you for the number, and another template that is just the reverse.

To be honest, I find Anki's interface for editing templates and decks too complicated. To get to the template creator, you have to open, "Browse Items," then click the "Card Layout" button, and finally switch to the "Fields" tab. That's not exactly intuitive — the fields are logically separate from the layout, and both are separate from the browse-able list of existing cards.

Still, the online user manual helps make sense of the internal structure of a flashcard deck, which is the main issue. Even more helpful is downloading an existing Anki deck from with the download tool, and examining its configuration.

Although you can download submitted decks directly from within Anki itself, the project does require you to set up an account if you want to access the AnkiWeb deck library through a web browser. The main benefit of this service is that you can also upload decks that you create — and you can choose whether to keep them private, or share them with everyone else. The private decks that you upload are invisible to the world at large, but you can sign in to your "AnkiWeb" account from other computers, including the aforementioned mobile apps, and retrieve your own creations. This allows Anki to keep your various devices synchronized, so you can pick up your study sessions from any of your devices without starting over. There is also a Google Groups mailing list for deck-creation support, where other Anki users appear to be a friendly and helpful bunch.

I suppose the "learning curve" that comes with Anki's deck and flashcard format is to be expected. The system is very flexible, and that is what makes it worth using. A vocabulary- or math-only flashcard application might have its share of fans, but giving you full control over the content and set-up results in a much more powerful utility.

I've downloaded a few a language training decks that I need to dedicate some study time to, and I can already tell you how much easier it is to launch Anki than to remember to sign in to a web course or crack open a textbook. Nevertheless, I will probably augment existing decks more often than I feel like starting a new one from scratch. But who knows; you may feel inspired to start writing decks from day one. Whether you want to refresh your own memory or help out a child with his or her homework, Anki gives you the tools to do it.

]]>

Comparing BlueGriffon and Bluefish: Which Open Source Web Editor is Right For You?

Two major open source Web editors made releases in recent weeks: Bluefish and BlueGriffon. Despite the similarity in names (not to mention the fact that both are designed to edit HTML, CSS, and JavaScript), the projects could hardly be less alike. Bluefish takes a programmer's approach, while BlueGriffon is designed to provide as close to a WYSIWYG-design experience as is possible. Which one best suits your needs can depend heavily on the details of your content.

Two major open source Web editors made releases in recent weeks: Bluefish and BlueGriffon. Despite the similarity in names (not to mention the fact that both are designed to edit HTML, CSS, and JavaScript), the projects could hardly be less alike. Bluefish takes a programmer's approach, while BlueGriffon is designed to provide as close to a WYSIWYG-design experience as is possible. Which one best suits your needs can depend heavily on the details of your content.

Bluefish

Bluefish has been actively developed since the late 1990s, which makes it an elder statesman compared to a lot of open source projects. But with that history comes stability, and the project has done an excellent job of keeping up to date with the ever-changing standards of web development and the evolving desktop Linux environment. Bluefish is GTK+-based and utilizes standard components from the GNOME platform, such as Pango and Cairo. It is available through most distributions' package managers, but if you have to install it from source, the dependencies are easily satisfied.

The new release is the 2.2.x series (as of right now, a bugfix release makes 2.2.1 the latest version). 2.2.0 introduced a number of important changes, starting with support for GTK+ 3, making it fit in better with GNOME 3 and recent Ubuntu Unity desktops. However, GTK+ 2.x is still fully supported as well, so users on any platform will get the same feature updates.

Bluefish is fundamentally designed to edit HTML source code, and attempts to make that experience as nice as possible. You can open your page in any web browser by clicking on the globe button in the toolbar, but you still edit the source in the editor itself. Where Bluefish helps you is in highlighting syntax, providing one-click access to commonly-used shortcuts for the languages of the web, and in maintaining multi-file sites as "projects" that you can update collectively.

Version 2.2.x features a completely rewritten syntax-scanning engine, which is reported to be drastically faster on very large files. That engine is what allows Bluefish to parse HTML and JavaScript, providing not only the color-coded syntax highlighting, but niceties such as collapsing functional blocks of code (say, long JavaScript scripts or wordy HTML tables) so that they don't take up space on screen.

There are other applications capable of doing syntax highlighting, of course, but Bluefish ships with support for all of the languages you need to design modern sites — HTML5, CSS3, and JavaScript, of course, but SQL, PHP, Ruby, and framework-specific syntax like Wordpress modules, too. The latest release also adds support for lightweight Zen-coding markup, an abbreviation-format to speed up page authoring.

While writing or editing a page, Bluefish attempts to give you one-click access to the operations you need while composing. Historically, this meant things like one-click addition of tags or insertion of code blocks. The new release adds several more shortcuts, such as a language- and context-aware "select" commands. If you are debugging a problematic page or script, you can hit Shift-Control-D and Bluefish will select the current function block, whatever that is in the context of your document. If you are editing HTML, it will select the tag or block that encloses the cursor; if you are in JavaScript, it will select the current function. The comment command is similarly intelligent; hitting Shift-Control-C will comment out the selection, automatically choosing the correct comment delimiters for the language and syntax you are using.

There are plenty of minor changes in 2.2 as well, including a rewritten search tool that integrates into the editor interface (as opposed to requiring a modal pop-up window), the ability to search files on the hard disk, and an extension to the syntax-highlighter that recognizes the names of functions and variables that you define just like all of the pre-defined keywords. That last feature makes it easy to jump to a function definition or use auto-completion with your own code.

BlueGriffon

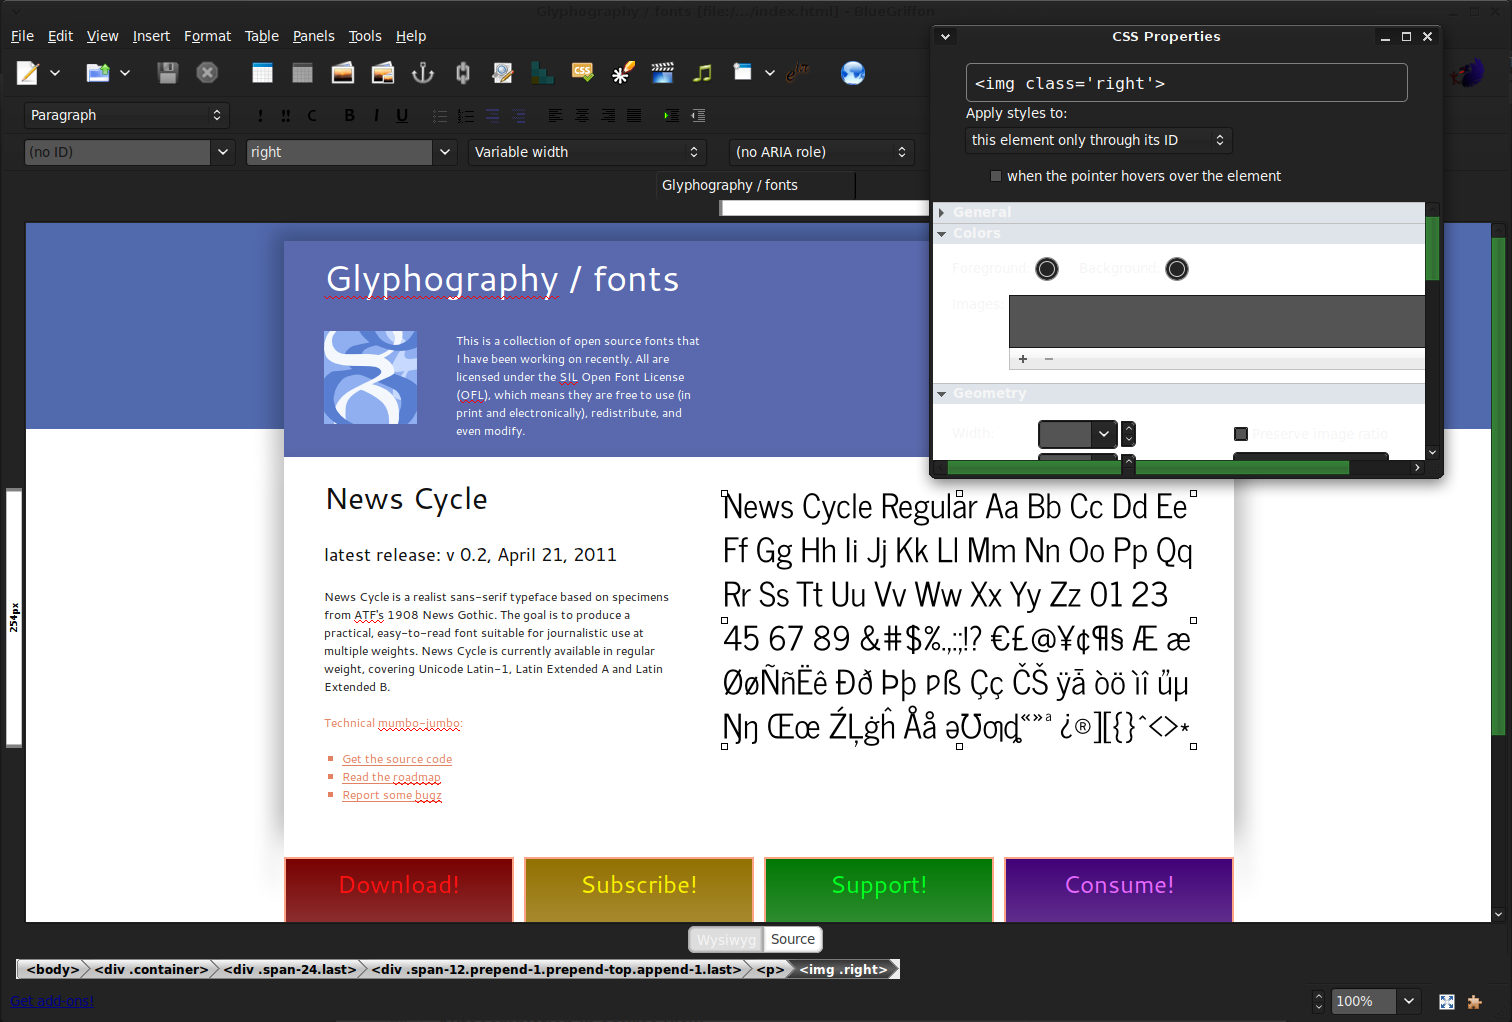
While Bluefish makes the HTML and JavaScript front-and-center, BlueGriffon attempts to provide a what-you-see-is-what-you-get (WYSIWYG) Web authoring environment. The page source is always available in a separate tab, of course, but the idea behind the editor is to let you work directly on a rendered version of the page.BlueGriffon

BlueGriffon is built on Mozilla code, and uses the Gecko renderer to produce this WYSIWYG page interface, which could impact your decisions if you need to optimize pages for Safari, IE, or another browser. The code base has had many ups and downs over the years — it started from the old Mozilla Composer editor component in the days before Firefox and Thunderbird were spun out as separate projects. For a while the application was known as Nvu, but developer Daniel Glazman discontinued it, and later started up BlueGriffon as its successor. Glazman announced the project in 2008, but the first releases did not appear until 2010. He maintains it independently, raising funds by selling Web-editing extensions through the BlueGriffon site.

The latest release is version 1.3.1, from November 24, 2011. As with most other Mozilla-based applications, BlueGriffon is cross-platform and is available in a wide assortment of languages. There are 32-bit and 64-bit Linux builds, as well as Windows and Mac OS X packages. The download is a binary installer script (although you can install it as non-root user for personal use); BlueGriffon is a self-contained XULRunner package. On the plus side, that means no dependencies to worry over, but on the down side the bundles are quite large.

BlueGriffon is quite capable as an editing tool; unfortunately the project does not publish release notes, so it can be quite hard to get a feel for what has changed over previous releases (although the blog does post periodic updates about bugfixes and enhancements, they are not bound to the release process). The rendered version of the page does not mark up HTML content — that would risk upsetting the alignment.

Rather, you can see the location of the cursor with sidebar "rulers" that mark off the active block element and give its dimensions. You can type text directly into the frame, and add or move media elements (images or videos) with the mouse. A toolbar at the bottom shows you the HTML element wrappers that enclose the current cursor position, complete with element IDs and style tags.

You can do basic word-processor-like markup to text in the WYSIWYG editor, including link and list formatting, but to really dig into the structure of your documents, you will need to use the separate CSS, form, MathML, and SVG editors. Here, BlueGriffon uses dialog boxes radio buttons to present the options. Although you can set every possible property an element supports this way, I am not sure if strictly qualifies as WYSIWYG, particularly for properties such as padding, color, shadows, and transformations that could be implemented in on-screen controls.

The project has been adding more GUI features since it turned 1.0 (which, believe it or not, was only a few months earlier in 2011), including a color picker harvested from the ColorZilla extension for Firefox, support for right-to-left text, and newer interactive features such HTML5 elements and CSS Media Queries. There are also customizable keyboard shortcuts and auto-completion in the source view editor. The commercial add-ons add even more features; they include a CSS stylesheet editor (as opposed to the one-element-at-a-time CSS property editor available by default), a table editor, and tools for managing JavaScript toolkits and multi-file sites.

Shades of difference

Having spent time in both of the new releases, my preference for the moment is Bluefish. Sure, you do not get to manipulate elements directly on the page, but these days most of the hard work of building a site is not layout-centric. Bluefish allows you to manage full sites, not just operate on one file at a time, and it has far better code editing components than BlueGriffon does. In fact, I would venture to say that the auto-completion, code folding, and syntax highlighting features in Bluefish make it easier to edit CSS-heavy pages than the pop-up CSS configuration GUI does in BlueGriffon.

Firefox extensions like Web Developer close much of the WYSIWYG gap, because you can inspect and even alter the code directly in the browser. Add to that the fact that you do not have to pay for features like table editing and stylesheet support, and Bluefish offers a more compelling experience. Nevertheless, BlueGriffon is developing at an astonishing rate these days; it is worth checking in every few months to see how much progress has been made. If Bluefish's "open in browser" does not offer you a fast enough view on your changes, you may find working in BlueGriffon a better fit. And like I frequently remind myself, if you still aren't sure, it's open source: you can afford both.

]]>

What Are The Best 10 Linux Desktop Apps?

This weekend, I'm going to be spending some time at the Southeast Linux Expo (SCALE) and presenting at the Linux Beginner Training. I'm doing the Desktops and Applications presentation, which includes demos of Linux desktop apps. As I was prepping for the talk, I needed to decide which apps to focus on for a audience new(ish) to Linux.

SCALE has been going strong for a decade, but the beginner training is a new program for SCALE. It's going to be a lot of fun working with an audience that's still getting started with Linux.

Now, when I started working with Linux the selection of desktop apps was a wee bit more limited than it is today. Choosing the best desktop apps to demonstrate now is a little trickier than in 1996. Users have a lot of variety when it comes to standard desktop apps like mail clients, Web browsers, and whatnot. In many cases, apps are a matter of taste rather than a hard and fast set of criteria that can objectively say "this is the best app for" whatever. How to choose?

I looked at a couple of things: Features, stability, desktop defaults, and cross-platform support. While the focus is Linux desktop apps, I think it's reassuring for users who are new to Linux to be able to find the same application on Windows and/or Mac OS X if they need to. Features and stability, of course, need no explanation.

I also took into consideration whether apps were the defaults for major distributions. This is a bit more difficult lately since Mint, Ubuntu, Fedora, openSUSE, Debian, and other distros are picking different defaults more now than a few years ago.

Browser: Firefox

I admit, I struggled a bit with choosing the Web browser. These days, I switch back and forth between Google's Chrome and Firefox. Chrome is gaining in popularity, and I know lots of Linux folks prefer it.

And yet... here's my problem with recommending Chrome. First, it's not shipped by default with any Linux distro and it's not open source. Sure, there's Chromium. But Chrome itself is not FOSS and it's a few extra steps for most users to install. Firefox, on the other hand, is right there.

But, during my presentation I'll be sure to mention both.

Office Suite: LibreOffice

Choosing LibreOffice was an easy decision. LibreOffice is the default for every major Linux distribution and has the tools that most desktop users need. Its Microsoft Office compatibility makes it a good choice for users who have to exchange documents with their co-workers and friends. Its cross-platform availability, for Windows and Mac OS X, means that it's a good choice for users who need or want to run other platforms.

Music Manager: Clementine

Picking the best music manager for Linux was a real challenge. In the end, I decided to go with my personal preference – even though it's not actually the default for many distros (if any). My pick is Clementine, a music player "inspired" by the first versions of Amarok.

It's easy to use, but powerful. It's very easy to create playlists and the sidebar with song and artist info (especially lyrics) is a nice touch. It also has excellent support for online services like Magnatune and Last.fm, which I use quite a bit. In particular, it comes in very handy as a downloader for Magnatune when you have a subscription.

Again, though, I'll be sure to mention other apps while doing the presentation – because there are just too many great apps here to ignore.

Video Player: VLC

VLC is, hands down, my favorite video player for Linux. Plays just about anything I've ever thrown at it, from streaming media to DVDs, and it is cross-platform. It's not just a video player, of course. VLC can also stream video and audio, though most users are probably going to be happy with the playback features.

Naturally, VLC also passes the cross-platform test. You can run VLC on Linux, Mac OS X, and Windows. There's also a VLC app under development for Android, though I don't know when that will be making an appearance.

Text Editor: Gedit

Vim is my editor of choice, but it's not exactly user friendly getting started. If this was a class for people learning to program on Linux, I might throw Vim out as an option. But for folks who are new to Linux, I think that Gedit is probably the best way to go.

Gedit may not have all the features of venerable text editors like Emacs and Vim, but it does the job nicely. It's especially useful for desktop users who need to edit the occasional text file, but don't need to be living in their text editor.

Image Editor: The GIMP

While GIMP may not be a direct replacement for Photoshop, it's a mighty fine image editor. I thought about going with a less complicated program, but decided that GIMP was the best-of-breed for Linux. The GIMP has been around for more than a decade, and can produce amazing results. Unless you're a pro user that's switching from Photoshop, The GIMP should provide all the tools you need for image editing on Linux.

Photo Manager: Shotwell

The GIMP provides nothing in the way of photo management, though. For users who want to manage their photo albums on Linux, Shotwell seems to be the app of choice these days. It's the default for Fedora and Ubuntu, and handles RAW photos as well as JPEG.

It also has a good set of basic editing features for cropping, getting rid of red-eye in photos, and so on. F-Spot used to be my app of choice, but the development seems to have slowed considerably with the last stable release in December 2010.

Mail Client: Thunderbird

Mail is another tricky one. First, the number of mail clients for Linux is staggering. Plus, many users now use Webmail most of the time, so a mail client may not even be necessary.

However, after a lot of thought, I decided that Thunderbird is the best app to recommend to new Linux users. First, it's cross-platform so if they also use Windows or Mac OS X, they can use Thunderbird with minimal hassle on all platforms. That's not true for Evolution or KMail.

Thunderbird is also a decent mailer, and with Mozilla taking it back under their wing (pardon the pun) it seems well positioned for improvements and maintenance. I'm not so sure about Evolution, to be honest. The project seems stalled, at best. Claws is a really nice mailer, but it's a power-users' app for sure. I don't think it's well-suited for new users.

So Thunderbird wins on features, stability, platform support and does well on defaults too. It's now the default for Linux Mint and Ubuntu, and really ought to be considered strongly for other distros.

BitTorrent: Transmission

Yes, folks, torrent apps can be used legitimately. With the SOPA/PIPA craziness the last few weeks, I wanted to be sure to talk about a good torrent app for new Linux users.

Linux has plenty of good Torrent apps, but Transmission seemed like the best option. It's cross-platform, performs well, and it's easy to use. It supports encryption, magnet links, and more.

Calendaring

This one gave me a bit of pause. Most of the folks I know use Web-based solutions for calendaring and collaboration, these days. It varies a lot, of course. If you're on KDE, then KOrganizer may be the way to go. If you're a die-hard GNOMEr, then you might want to stick with Evolution.

But I think the best cross-desktop solution at the moment is Thunderbird's Lightning. It's not perfect, but it's very capable and a great solution if you're not looking for a business solution. In other words, I think Lightning is problematic for business adoption but fine for personal desktop users who don't need a groupware solution.

Your Picks?

What are your favorite apps, and did we miss some important categories? Would love to get some feedback in the comments.

]]>

Weekend Project: Loading Programs Into Arduino

In last week's Weekend Project, we learned what the Arduino platform is for, and what supplies and skills we need on our journey to becoming Arduino aces. Today we'll hook up an Arduino board and program it to do stuff without even having to know how to write code.

In last week's Weekend Project, we learned what the Arduino platform is for, and what supplies and skills we need on our journey to becoming Arduino aces. Today we'll hook up an Arduino board and program it to do stuff without even having to know how to write code.

Advice From A Guru

Excellent reader C.R. Bryan III (C.R. for short) sent me a ton of good feedback on part 1, Weekend Project: Learning Ins and Outs of Arduino. Here are some selected nuggets:


Solder: 63/37 is better, especially for beginning assemblers, because that alloy minimizes the paste phase, where the lead has chilled to solid but the tin hasn't, thus minimizing the chance of movement fracturing the cooling joint and causing a cold solder joint. I swear by Kester "44" brand solder as the best stuff for home assembly/rework.Wash hands after handling lead-bearing solder and before touching anything.Xuron Micro Shear make great flush cutters.Stripping down and re-using old electronic components is a worthy and useful skill, and rewards careful solder-sucking skills (melting and removing old solder). Use a metal-chambered spring-loaded solder sucker, and not the squeeze-bulb or cheapo plastic models.Solder and de-solder in a well-ventilated area. A good project for your new skills is to use an old computer power supply to run a little PC chassis fan on your electronics workbench.


Connecting the Arduino

Consult Installing Arduino on Linux for installation instructions, if you haven't already installed it. Your Linux distribution might already include the Arduino IDE; for example, Fedora, Debian, and Ubuntu all include the Arduino software, though Ubuntu is way behind and does not have the latest version, which is 1.0. It's no big deal to install it from sources, just follow the instructions for your distribution.

Now let's hook it up to a PC so we can program it. One of my favorite Arduino features is it connects to a PC via USB instead of a serial port, as so many embedded widgets do. The Arduino can draw its power from the USB port, if you're using a fully-powered port and not an unpowered shared hub. It also runs from an external power supply like a 9V AC-to-DC power plug with a 2.1mm barrel plug, and a positive tip.

Let's talk about power supplies for a moment. A nice universal AC-to-DC adapter like the Velleman Compact Universal DC Adapter Power Supply means you always have the right kind of power. This delivers 3-12 volts and comes with 8 different tips, and has adjustable polarity. An important attribute of any DC power supply is polarity. Some devices require a certain polarity (either positive or negative), and if you reverse it you can fry them. (I speak from sad experience.) Look on your power supply for one of the symbols in Figure 1 to determine its polarity.

Figure 1 shows how AC-to-DC power adapter polarity is indicated by these symbols. These refer to the tip of the output plug.

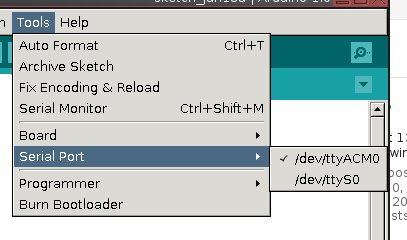
Getting back to the Arduino IDE: Go to Tools > Board and click on your board. Then in Tools > Serial Port select the correct TTY device. Sometimes it takes a few minutes for it to display the correct one, which is /dev/ttyACM0, as shown in Figure 2. This is the only part I ever have trouble with on new Arduino IDE installations.Figure 2

Figure 2: Selecting the /dev/ttyACM0 serial device.

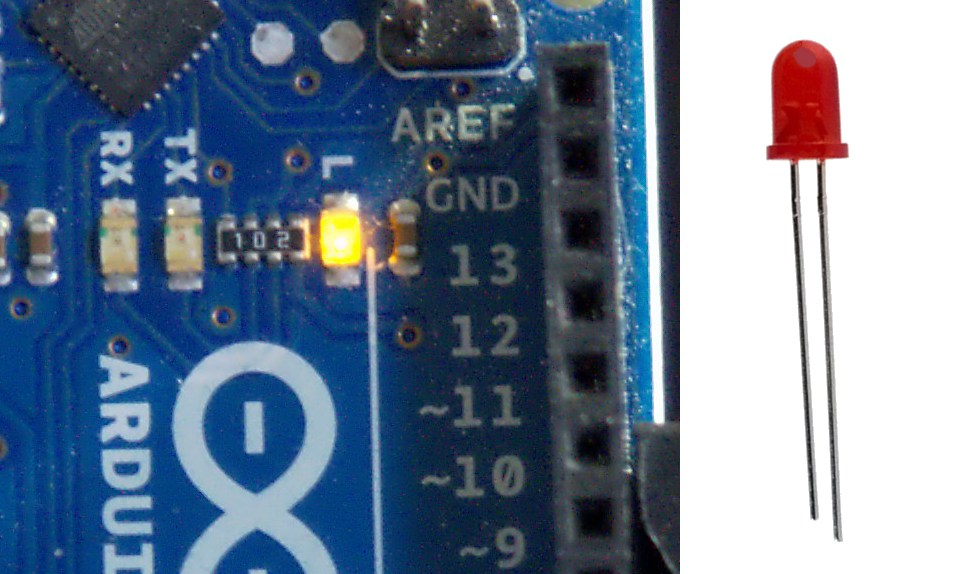
Most Arduino boards have a built-in LED connected to digital output pin 13. But are we not nerds? Let's plug in our own external LED. Note how the LED leads are different lengths. Figure 3 shows how many Arduino boards have an onboard LED wired to pin 13. External LEDs have two leads, and one is longer than the other. The long lead is the anode, or positive lead, and the short lead is the cathode, or negative lead.Figure 3

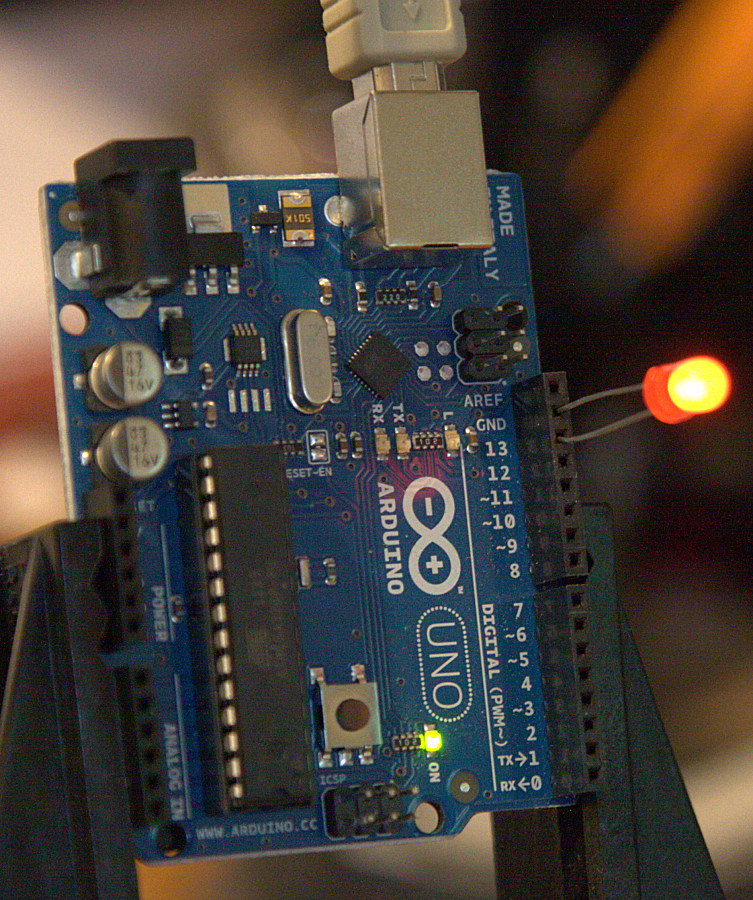
Plug the anode into pin 13 and the cathode into the ground. Figure 4 shows the external LED in place and all lit up.

Loading a Sketch

The Arduino IDE comes with a big batch of example sketches. Arduino's "hello world"-type sketch is called Blink, and it makes an LED blink.Figure 4


/* Blink Turns on an LED on for one second, then off for one second, repeatedly. This example code is in the public domain. */void setup() { // initialize the digital pin as an output. // Pin 13 has an LED connected on most Arduino boards: pinMode(13, OUTPUT); }void loop() { digitalWrite(13, HIGH); // set the LED on delay(1000); // wait for a second digitalWrite(13, LOW); // set the LED off delay(1000); // wait for a second}

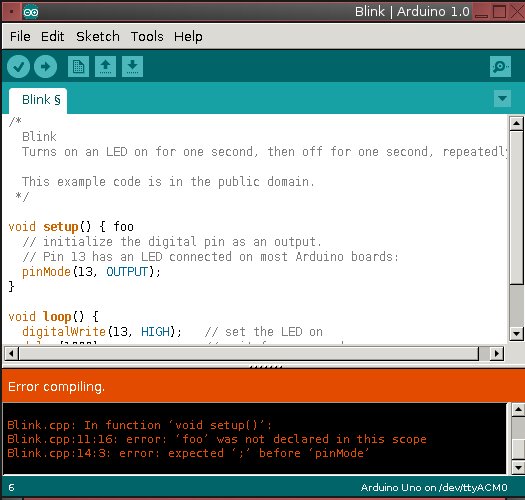
Open File > Examples > Basic > Blink. Click the Verify button to check syntax and compile the sketch. Just for fun, type in something random to create an error and then click Verify again. It should catch the error and tell you about it. Figure 5 shows what a syntax error in your code looks like when you click the Verify button.Figure 5

Remove your error and click the Upload button. (Any changes you make will not be saved unless you click File > Save.) This compiles and uploads the sketch to the Arduino. You'll see all the Arduino onboard LEDs blink, and then the red LED will start blinking in the pattern programmed by the sketch. If your Arduino has its own power, you can unplug the USB cable and it will keep blinking.

Editing a Sketch

Now it gets über-fun, because making and uploading code changes is so fast and easy you'll dance for joy. Change pin 13 to 12 in the sketch. Click Verify, and when that runs without errors click the Upload button. Move the LED's anode to pin 12. It should blink just like it did in pin 13.

Now let's change the blink duration to 3 seconds:


digitalWrite(13, HIGH); // set the LED on delay(3000); // wait for three seconds


Click Verify and Upload, and faster than you can say "Wow, that is fast" it's blinking in your new pattern. Watch your Arduino board when you click Upload, because you'll see the LEDs flash as it resets and loads the new sketch. Now make it blink in multiple durations, and note how I improved the comments:


void loop() { digitalWrite(13, HIGH); // set the LED on delay(3000); // on for three seconds digitalWrite(13, LOW); // set the LED off delay(1000); // off for a second digitalWrite(13, HIGH); // set the LED on delay(500); // on for a half second digitalWrite(13, LOW); // set the LED off delay(1000); // off for a second}


Always comment your code. You will forget what your awesome codes are supposed to do, and it helps you clarify your thinking when you write things down.

Now open a second sketch, File > Example > Basics > Fade.


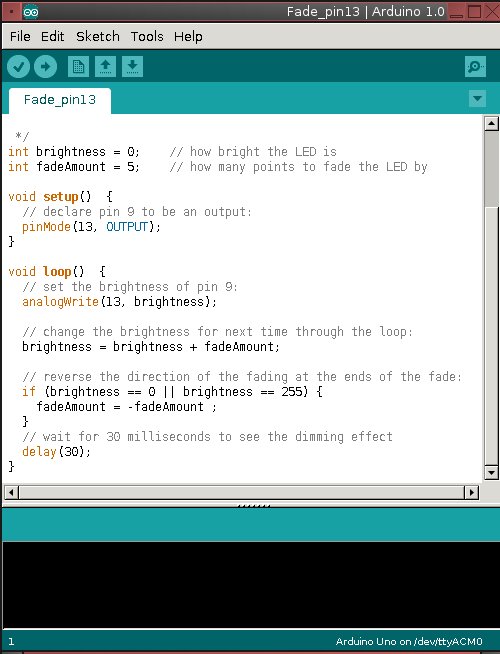
/* Fade This example shows how to fade an LED on pin 9 using the analogWrite() function. This example code is in the public domain. */int brightness = 0; // how bright the LED isint fadeAmount = 5; // how many points to fade the LED byvoid setup() { // declare pin 9 to be an output: pinMode(9, OUTPUT);} void loop() { // set the brightness of pin 9: analogWrite(9, brightness); // change the brightness for next time through the loop: brightness = brightness + fadeAmount; // reverse the direction of the fading at the ends of the fade: if (brightness == 0 || brightness == 255) { fadeAmount = -fadeAmount ; } // wait for 30 milliseconds to see the dimming effect delay(30); }


Either move the anode of your LED to pin 9, or edit the sketch to use whatever pin you want to use. Click Verify and Upload, and your LED will fade in and out. Note how the Blink sketch is still open; you can open multiple sketches and quickly switch between them.

Now open File > Example > Basics > BareMinimum:


void setup() { // put your setup code here, to run once:}void loop() { // put your main code here, to run repeatedly: }


This doesn't do anything. It shows the minimum required elements of an Arduino sketch, the two functions setup() and loop(). The setup() function runs first and initializes variables, libraries, and pin modes. The loop() function is where the fun stuff happens, the blinky lights or motors or sensors or whatever it is you're doing with your Arduino.

You can go a long way without knowing much about coding, and you'll learn a lot from experimenting with the example sketches, but of course the more you know the more you can do. Visit the Arduino Learning page to get detailed information on Arduino's built-in functions and libraries, and to learn more about writing sketches. In our final part of this series we'll add a Wave audio shield and a sensor, and make a scare-kitty-off-the-kitchen-counter device.

]]>

A Broad Look at Hugin

The release notes for Hugin's latest update begin with the words "Hugin is more than just a panorama stitcher." That's been true for years, but only recently has the project made a concerted effort to emphasize the other photo magic that the application is capable of working. Better still, Hugin is making more and more of the process automatic, so aligning your images has never been easier.

The release notes for Hugin's latest update begin with the words "Hugin is more than just a panorama stitcher." That's been true for years, but only recently has the project made a concerted effort to emphasize the other photo magic that the application is capable of working. Better still, Hugin is making more and more of the process automatic, so aligning your images has never been easier.

In case you are unfamiliar with it, Hugin is a tool useful for bending and correcting photos in interesting ways. The initial use case was sewing side-by-side photographs together into a seamless panorama, but the bag of tricks has expanded considerably over the years. Hugin can instantly take the "warp" out of a wide-angle shot, remove color fringing from the edges of a picture, straighten the converging sides of a tall building when shot from below, and make other corrections that it would be arduous — if not impossible — to do by hand.

But it is not all work; Hugin can still play at the zany tasks, like stitching a series of images into a 360% virtual-reality picture, removing pesky objects (or people) from the foreground of a photo, and blending multiple exposures of a scene into a perfectly-balanced shot.

The new release is tagged 2011.04.0 — Hugin has adopted a time-based released schedule centered around three stable builds per year, but produces very awkward version numbers. You can grab the latest packages from the download page; distro-specific instructions are provided for Ubuntu and Fedora, plus binaries for Windows, Mac OS X, and FreeBSD, and compilation guides for several other Linux distributions. The downloadable packages include the main application, plus a handful of utilities that Hugin uses for specific tasks like blending photographs together without leaving an unsightly seam. Most of these tools were originally written to function as Hugin plug-ins, but they work as standalone apps, too.

What's New

There are two entirely new functions in this Hugin series. One is a lens calibrator. You take a picture of some ramrod-straight objects (preferably at varying distances), and the app measures the minro distortions in the picture to create a lens profile. On subsequent runs, Hugin will know with better precision how to adjust your images for perfect horizontal and vertical lines. The second is the ability to "register" (i.e., properly align) stereo images. Like the Viewmaster toys of yesteryear, stereo images can be used for a simple and fun 3D effect — but they are also useful to scientists extracting three-dimensional data of objects just from photographs.

It is not as immediately gratifying, but an arguably bigger improvement is the addition of complete scripting support with Python. This Python support works in both directions: you can write your own plug-ins for Hugin to automate tasks, and you can write Python applications that call library functions from Hugin. The possibilities here are excellent; for example GIMP also supports Python scripting — you could write a GIMP plugin to automatically stitch images together using Hugin without ever leaving the GIMP interface itself.

The project has already taken the first steps towards offering a different UI for its non-panorama tasks, in the form of the aforementioned lens calibrator, which can be launched from a separate Applications menu item that is installed alongside the usual Hugin panorama-creator. The calibrator is a stripped-down interface with no tabs and no extraneous features — just the image loader, preview window, and some options. Although on Linux it is a standard ELF binary, the new Python scripting interface makes crafting other sub-project apps far easier.

There are some incidental improvements too, such as composition guides (lines marking off the golden ratio or rule-of-thirds) to help you create eye-pleasing crops, but most of the other enhancements come in the form of increased automation in Hugin's core tasks. Hugin can now find the horizon automatically, and at long last has an automatic control point finder that is completely free of the software patent threats that have loomed over similar work. To really get a feel for the difference this sort of enhancement makes, you will need to fire up Hugin.

A Panoply of Fun

In older releases, Hugin's interface might have been disparaged as a clutter of buttons and numeric entry boxes with little help offered to guide the intrepid new user towards success. Luckily the recent releases have put an increasing emphasis on exchanging that paradigm for "assistant"-guided operation. Now, whenever you launch Hugin, you see nine tabs across the top of the window: Assistant, Images, Camera and Lens, Crop, Mask, Control Points, Optimizer, Exposure, and Stitcher. That sounds like a lot, but the key is that Assistant tab at the head of the list. Experts can dive right in, of course, but if you're new, the Assistant tab will walk you straight through the options.

To merge a set of side-by-side shots into a panorama (or simply a larger mosaic of photos), then the assistant will walk you through the process: where you need to perform a step (such as choosing the images from your hard drive), it will prompt you for action; where it can automatically proceed it will do so and report its results; where it encounters trouble it will suggest what you need to do next. In the accompanying screenshot, for instance, I ran into a stumbling block when I loaded my images in right-to-left order (when they physically were a left-to-right scan of the scenery). Naturally, Hugin couldn't figure out how the edges matched up.

Normally, however, Hugin can automatically locate the points where the photos overlap, and it tags them as "control points." Those points are how Hugin calculates how to squeeze and rotate the images so that they line up perfectly. It can also automatically crop the resulting panorama, find objects that should be perfectly vertical, correct the horizon line, blend the images to match variations in exposure, and pick out trouble spots like clouds that move between one shot and the next.

The list of automatic adjustments Hugin can make has grown considerably over time, but it is not yet at 100 percent. Sometimes you need to make tweaks. The output of the example I played with for these screenshots is available on Flickr; if you look closely you can see that the curve of the waterline and the fact that the horizon was hidden behind so many buildings left a few spots not-quite-vertical — but I can go back and fix those.

Here's the trick, though: if you want to get the most out of Hugin, you still ought to avail yourself of the project's excellent tutorials. If nothing else, they will teach you about the differences between the various options for output "projection" of panoramas. These projections are like map projections: you have different features important for different situations. Most of the time a big scenic panorama will be a "rectilinear" projection, but sometimes you want something else.

The tutorials are also an invaluable guide for Hugin's other features, such as blending multiple exposures into one shot, removing lens distortions from a single picture, or taking shots around a foreground obstruction and masking it out of the final product.

Under the hood, a lot of the math is the same in these functions, even though it might not be obvious at first. For example, Hugin creates seamless blends where two stitched photos by averaging the overlapping pixels together and making a smooth transition. Essentially the same calculations are involved in merging two exposures — except that the borders of the merged region are where the "bright exposure" and "dark exposure" meet, instead of the adjacent edges of the frame.

There is some fun stuff you can do with this fundamental similarity, such as focus stacking, where you keep the camera still and take pictures focused up close and far away. Hugin can merge them into a picture with everything in focus. This is not any different from the integration performed by the much-hyped "Lytro light field camera" — except that Hugin does it for free.

Off in the Distance

I don't want to mislead anyone into thinking that Hugin is a "hands off" application — yet. The increasing automation of alignment and stitching functions is great, but these days you still need to poke around a little to get a feel for the panorama, exposure stacking, or focus stacking workflow — and how they differ. Hugin is headed in the right direction, but the cost of its flexibility is that it is not as simple to use as one of those camera phone apps that attempts to stitch a panorama without your intervention.

However, that is precisely why I am fired up about the new Python scripting interface. Development of the assistant-mode and stand-alone calibrator features has been slow, but it had to be because there was no clean, consistent interface to Hugin internals. Now there is. I'm hopeful that the development community will work on assistant front-ends for the other, non-panorama features of the app (such as the aforementioned exposure- and focus-stacking). Those are simpler tasks and a lot of users will love to take advantage of them. I think there is also a strong chance that we will see GIMP plugins that use Hugin magic to perform minor miracles like automatically straightening the horizon — the door is wide open.

]]>